Friday, October 25, 2013

Scrappy Bookmarks

What's a stitch-happy, scrap-collecting, book-loving girl to do when she finds herself with a table full of fabric scraps after making stitched fabric postcards?
Why, make a set of scrappy bookmarks, of course!
I must truly belong to the tribe of "Never Too Many Bookmarks," because my collection just continues to grow and grow.  (I hate to admit how many times I STILL tear off a piece of paper or use a sticky note to mark my page when my house is FULL of handcrafted bookmarks!)
To make these, I assembled my scraps and stitched through them using various styles of stitches, then used a straight stitch to attach a second piece of paper; that way I could hide all of my crazy wrong-side stitching from view.
Back view of bookmarks
I have read some other tutorials for making scrappy bookmarks that sounded interesting.  In one project, the woman stitched fabrics to both sides of the bookmark, and I LOVE how hers (actually her young daughter's) turned out, but I really don't like my messy stitching showing through on one side; I haven't mastered NEAT machine-stitching yet!

And the other had me lining the fabrics with fusible interfacing, and even though I have some in my supply stash, I just couldn't bring myself to be bothered when I already like how these turned out.  But I have linked to both of these other tutorials in case one of them suits you better than the approach I've used here.  (Both are on my Fabric and Sewing Projects board on Pinterest.)
Happy scrap stitching!


Wednesday, October 23, 2013

Stitchy Vintage Collage

After working on my fabric postcards for the Great Big Stitched Postcard Swap, I moved away from fabrics and back to papers, creating a series of collages with mostly vintage materials.  They are 4"x6", perfect for either sending as postcards or framing as collage art (or both!).
This postcard features vintage seam binding, business envelope liner, postage stamps, music, a bill of sale from the 1890s, and an authentic photo...all original materials.
I love it when the colors come together perfectly!  That's when it just really feels like all the ephemera is falling into place.
And that original 1890s handwriting:  Swoon!

I love the image on this next postcard:  It comes from a gift book filled with images and quotations related to mothers and their children.  In this one, a mother looks on a bit reprovingly as her teenage daughter talks on the telephone.  Such a class image!
Everything else on the card is "authentic vintage ephemera":  postage stamps, musical score, bill of sale.  I really like how the postage stamps create a backdrop for each figure's head.
For my "Musical Zoo" postcard, I used a scrapbooking embellishment:  a paper frame that I had stashed with my "baby" themed scrapbooking paper.   The shiny flower embellishments came from dear Miss Mary.  The little girl came from the same gift book as the image above, while the music papers and postage stamps are "authentic vintage."
You can see the influence of my Great Big Stitched Postcard Swap postcard on this last one:
I used Distress Ink to stamp on the seam binding, which I then machine stitched across the card, and I hand-sewed buttons in the corner, similar to my fabric cards. 
I also included another image from the "mom book" and another scrapbooking frame.
And so the scrappy stitching continues!

Happy Fall!

Monday, October 21, 2013

Feeling the Mail Art Love

There's really nothing quite like opening the mailbox and seeing a hand-painted envelope, an altered postcard, a foreign stamp, or a big puffy package waiting to be opened.

I've been feeling the mail art love over the past couple of weeks, and wanted to give you a peek into the postbox:

I have a new British swap partner named Sue, who sent me this fun painted and collaged postcard for our first exchange:
I received this gorgeously decorated envelope from Robin in New Zealand, filled with a letter and a stack of scrapbook/Smash book-style embellishments for my art journal and mail art:
This beautifully painted and stamped envelope came from Betsy right here in Pennsylvania.  We were supposed to meet up at the CREATE Art Retreat back in July, but never made the connection.  She sent along some fun postage stamps and air mail labels that will soon be making their appearance in all of the air mail I need to be sending out to my swap partners!
I was so happy to hear from Eli again, from Argentina.  She renewed our swapping partnership with a fun collection of ephemera:
And, finally, the ever-generous and thoughtful Mary sent me a BIG collection of Christmas goodies--old cards, tags, gift bags, rub-ons, and lots and lots of stickers.  She included several pages of these way-cool puffy stickers that took me right back down memory lane to my elementary-school sticker collection:
As always, I am so grateful for my long-distance friends, and for the way people continue to reach out in creativity and generosity to maintain our on-line, artful friendships.


Monday, October 14, 2013

Feeling Stitchy

My stitched postcard for the Great Big Stitched Postcard Swap is due, and this weekend I sat down to give the project some serious consideration.
I was greatly inspired by an article in the Handcrafted publication (Volume 8), entitled, "Quilted Love Notes," by Jen Osborn.  I loved her layered fabrics, rough edges, primitive stitches, vintage photos, attached buttons, and printed ribbons.  My own fabrics, photos, ribbons, and stitches fell into place so naturally that it felt like a project that was definitely meant to happen!
I have a tendency to demand a certain perfection to my projects.  That is not to say that I think I am so great and so perfect; it is to say that I think all edges must line up, and paper must not rumple or tear, and stitches must align perfectly.  And it is to say that I toss things out in frustration that do not fit that standard.  For whatever reason, I felt blissfully freed from those requirements with this project, and I love the overall floppy, off-kilter, primitive feel of what resulted.
Rather than using hand-dyed fabrics, as Jen did, I scrounged around in my fabric stash for some likely candidates for my postcards.  My stash consists of old blue jeans, an old pair of off-white corduroys,  and a huge stash of my kids' outgrown clothes that seemed to have nice patterns or designs.  And rather than using the custom-printed ribbons by Anna Barrow that Jen mentions, I took old seam binding from my grandmother's stash, and used blue Staz-On ink and some rubber stamps to make my own custom messages.
The actual placement of elements felt easy and natural.  The most challenging task was just figuring out which layers to stitch together first so that any hand-stitching of buttons or photos did not require needle-breaking work through too much fabric.
I even got to raid my modest button collection for a few appropriate embellishments for each postcard.
I had so much fun putting stitched postcards together, that I ended up with three possibilities to choose from for the swap.  I have decided to send "Object of My Affection" to my swap partner, because I have found appropriate homes for the other two.
This stitching project kept me reaching into my fabric, binding, and paper stash all weekend, so I have a few more projects to share with you in an upcoming post.  And to all those wonderful people who have sent me mail art over the past few months that has gone woefully un-reciprocated:  I promise that there will be something fun in your mailbox SOON!

Friday, October 11, 2013

Christmas in October: Glass Ornaments

Yes, it's true:  I'm here with a blog post for my Christmas in [Insert Month Here] series without waiting for the last day of the month, or missing the month altogether!
A long time ago, I watched a crafting video in which a man dripped alcohol inks into clear glass Christmas balls, and then blew the inks around using a can of compressed air.  While I wanted to try the project, I didn't have any alcohol inks at the time, nor did I have a can of air (!), and I wondered if I could just drip craft paints into a similar glass ball ornament and let the different colors spread and blend inside.

Excited by the possibilities, I rushed out to purchase the clear glass Christmas balls--and promptly stored them away for over a year!

Thus, they were prime candidates for this series, which keeps me prepping for Christmas all year long, as well as completing projects that I've had in the back of my mind for months and months and months.

First, I removed the silver part used for hanging at the top of each glass ball.
Then, I played around with color combinations that I wanted to drip inside.  I used mostly basic craft acrylic paint--nothing fancy.  (Perhaps "fancy" would have yielded pretty results more quickly, though.  I think the thinner and more fluid the paint, the more successful your project will be.)
My initial results were really beautiful and exciting.  (Notice my use of old cloth diapers on my craft table; they were burp cloths for my children in their first life, and now indispensable crafting tools!)
I got experimental with metallic champagne, yellow, and black for this one!
And the ornaments look so different from every vantage point.
After patiently watching the craft paint swirl around and cover every internal surface (very meditative, I must say), and letting them drip out a lot of excess paint onto the cloth, I set them aside to dry for awhile.  When I came back to check on them later, this is what I found:
Not exactly the look I was going for!  The paint had separated and created a cracked appearance.  In retrospect, maybe it has a bit of the patina of vintage Shiny Brite ornaments, but I wasn't pleased.

In the spirit of a grand experiment, I spritzed some inks inside, letting them cover over the "cracks" from the inside, and allowing the extra liquid to drain out.  And in the case of several of the ornaments, I dripped more black craft paint inside to create a dramatic background color.

Here are my final results:
And the individual ornaments:
This is my favorite.  It turned out nicely from the beginning, and never required an extra squirt of black paint.  It also makes me laugh that I reached for the red paint to provide a background, and squirted in orange instead, because I wasn't paying attention to what I was doing.  I was surprised by how nice the orange looked with pink and gold!
This looks like some sort of planet with swirling clouds, seen from the vantage point of space.  It has metallic bronze, gold, AND champagne paint in it; I went all out on the color combination.  So dramatic and pretty!
I guess this kind of looks like a planet to me, as well.  Because I chose black as that background color, the ornaments as a group look a bit darker than I might like.  But what do I expect when I go squirting black into almost every one of them!

More dramatic swirls.
I think they would make very pretty Christmas gifts with bows tied to the loop at the top, presented in their own individual gift boxes.  The project was a major process of experimentation, and I took LOTS of time just messing around, watching the colors swirl.  But I declare it a success, and think it is something kids could have fun playing around with, too!
Happy Christmas in October!

*******************************************
For a list of all my Christmas in [Insert Month Here] posts, click on the label in the left margin of the blog, or visit my last post, and find the other links right at the end.


Sunday, October 6, 2013

Allentown Paper Show, Take Two

This weekend, I made my second Paper Pilgrimage of the year to Allentown, Pennsylvania, to the paper show being held on the city's fairgrounds.

I still find it remarkable (as does my husband, I'm sure) that there are so many people in the world who share my love and appreciation for all things ephemeral.  Besides table after table of postcards and old photos, there were some more unusual items, as well, such as :
Boxes of badges
Walls and tables covered in documents and posters
Shelves piled with books, magazines, and catalogs
Vintage soap boxes (for $30 a pop!)
Bottles and tins
Whiskey miniatures (did you catch that price?  $285 for the box!)
A chemical set (who knows what could be in those little bottles?)
A suitcase filled with vintage cake toppers
Even a box of old scissors shoved under a table!

When I went to the show back in April, I was absolutely blown away by the fabulous display of postcards, documents, posters, books, medals, badges, game pieces, vintage boxes, maps, and on and on and on.  I have to admit that this time, despite my comment at the end of my previous post, I actually felt a little saturated in paper (how's that for a contradiction in terms?!), and didn't feel nearly as lightheaded by the wall-to-wall booths filling two huge rooms.

For one thing, I was a little more put off by prices this time around.  Maybe I noticed it last time, too, but I just didn't seem to find as many "deals."  I saw a postcard for $120, for crying out loud...how is that even possible?

And I got chastised by the owner of the very first booth I entered in the morning, who didn't want me looking through some Civil War documents he had for sale.  I kind of wondered how precious they could really be as they sat there in a stack on a folding chair next to his display table.  It put a bit of a bad taste in my mouth as I started my way around the show.

Happily, any negative feelings were swept aside when I had the great good fortune to meet up with someone I had met recently in Blogland.  Becky, also known as The Snail Mailer, who keeps a blog over at Leaving a Paper Trail (I love that name!), came by the show and poked around with me, helping me spot some deals and engaging the vendors in some wonderful conversation.
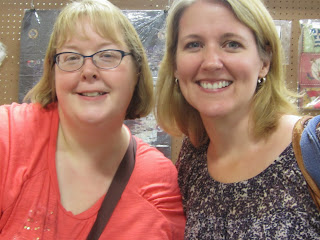
Becky and I at the Paper Show
Perhaps the most memorable part of our day was meeting was meeting Kathy Kreiser.  Besides offering the best deal of the day (10 postcards for a dollar!), she chatted away with us about our collage work and mail art.  She was so excited and supportive of what we do!  It was a pleasure to receive her enthusiasm, not to mention her generous deals.
Kathy and I at her Paper Show booth
So, now, of course, the BIG QUESTION:  What kind of loot did I bring home with me from the show??

Here's the damage:
Postcards!
More postcards, a couple of photos, and some vintage greeting cards
Colorful clips for decoupage--only 50 cents a sheet at Kathy's booth
Train passes--love these!--some from as early as 1902, and on through each decade into the 1950s
Some stock certificates, souvenir postcards, and old calendars
Postcards with blank fronts just waiting for some mail art collage
A cardboard toy village with mail art possibilities
A collection of scraps marked "FREE" at Kathy's booth
Some goodies that Becky was sweet enough to bring along with her to share with me

There is a lot of kindness in the world, folks, if we just open our lives to it!  I enjoyed a great day poking around the paper show, came away with more loot than I realized until I dumped out my bag of goodies once I got back home, and made a new blogging friend (yay, Becky!) who might just be organizing a Letter Writing Social somewhere close enough for me to actually attend.

Now, off to the art room to play with my new scraps!